Manage JRiver MC Filters
JRiver Media Center is a media player which integrates a rich DSP engine with video playback. The DSP engine provides a feature set which exceeds that of all AV processors with the exception of immersive audio support.
The Media Center application uses its DSP Studio to configure the DSP engine however this has some limitations:
- it uses an unconventional definition of Q for both shelf filters and high/low pass filters
- there are limited high/low pass filter types available
- there are limited bass management options available and crossover design is tricky
- it has no fast/easy way to manage large filter sets or any interoperability with filter design tools
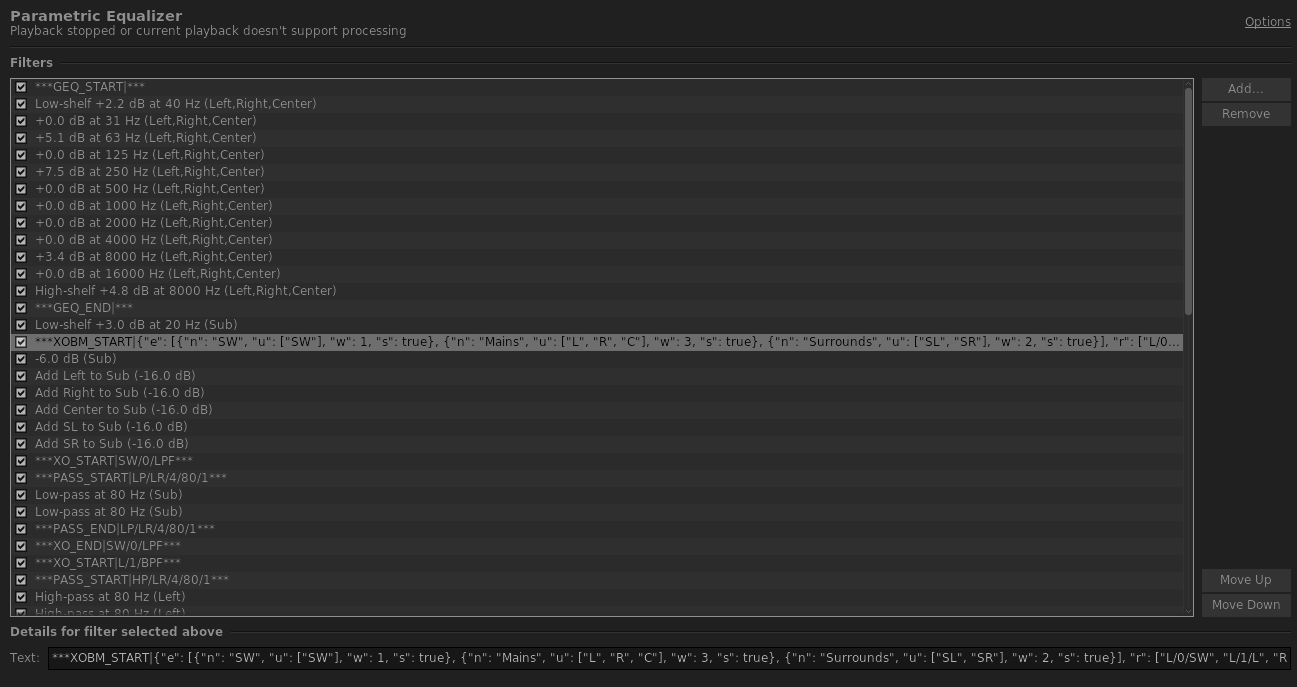
- the filter pipeline is presented as a simple text list which can make a signal chain difficult to understand
- there is no visual guide to the filter response
- usability is a challenge as a result of an absence of keyboard shortcuts and undo/redo functionality
BEQDesigner attempts to solve these problems.
Opening the Dialog
This is launched via Tools > Manage JRiver MC Filters or the CTRL+J keyboard shortcut.

Info
Use the button tooltips to understand what they do.
Getting Started
Creating a Empty Configuration
To create a new (empty) configuration:
- click New
- select an output format
- enter a configuration name
Loading an Existing Configuration...
Warning
When loading an existing configuration, it must already have at least one active Parametric Equalizer block.
from a file
To load an existing configuration exported from Media Center using the Load/Save DSP File option:
- click Open
- select a dsp file
The screen will update to display the contents of the 1st listed Parametric Equalizer block in DSP Studio.
from a running Media Server
DSP configuration can be loaded from a running Media Server if:
- it is a v28 installation
- Media Network is activated
To load such a config
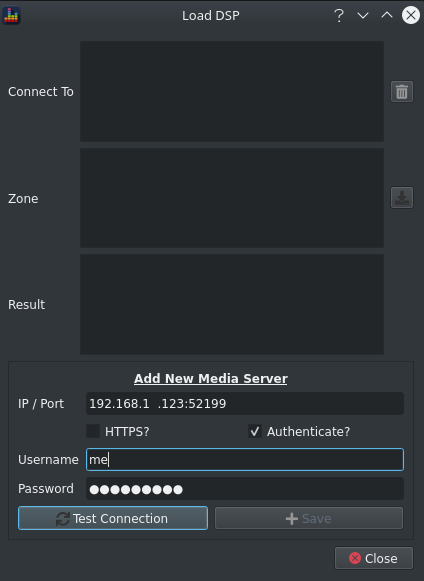
- click Download
- (on first use) enter the connection details for the Media Server, click test connection and then save assuming the test was successful
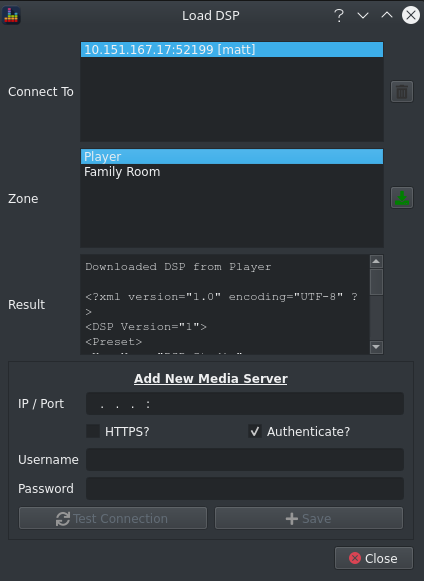
- select the Media server instance and the zones list should be updated
- select a zone and click the download button
The downloaded config should be now be shown in the result text field and the configuration loaded into the editor.
If the selected zone has no active Parametric Equalizer sections, an error dialog will be displayed
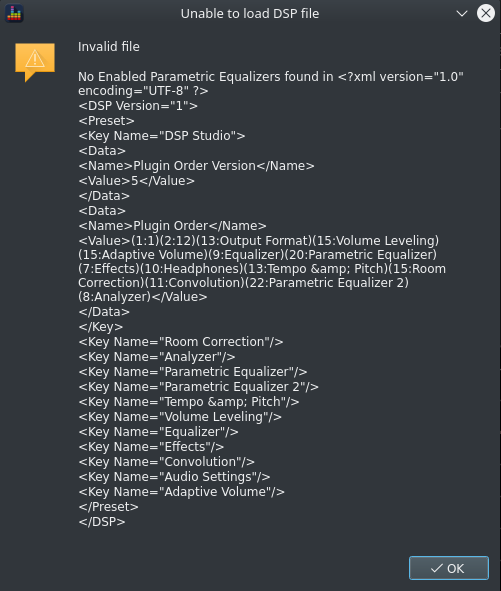
To workaround this, open Media Center on the specified host and enable the Parametric Equalizer sections in DSP Studio.
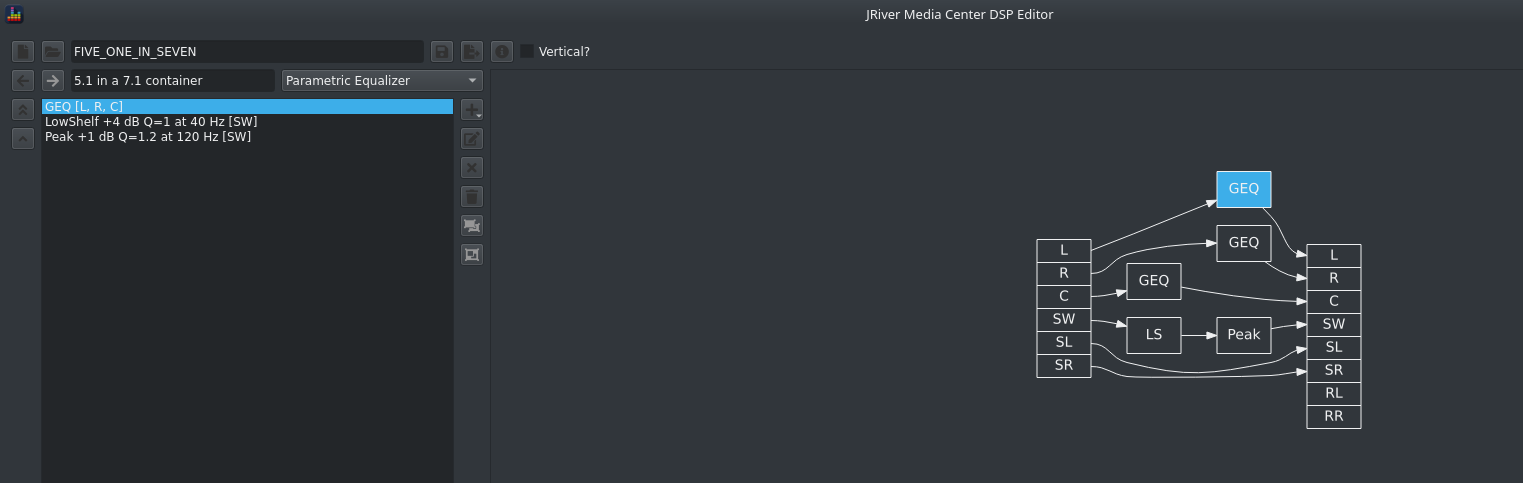
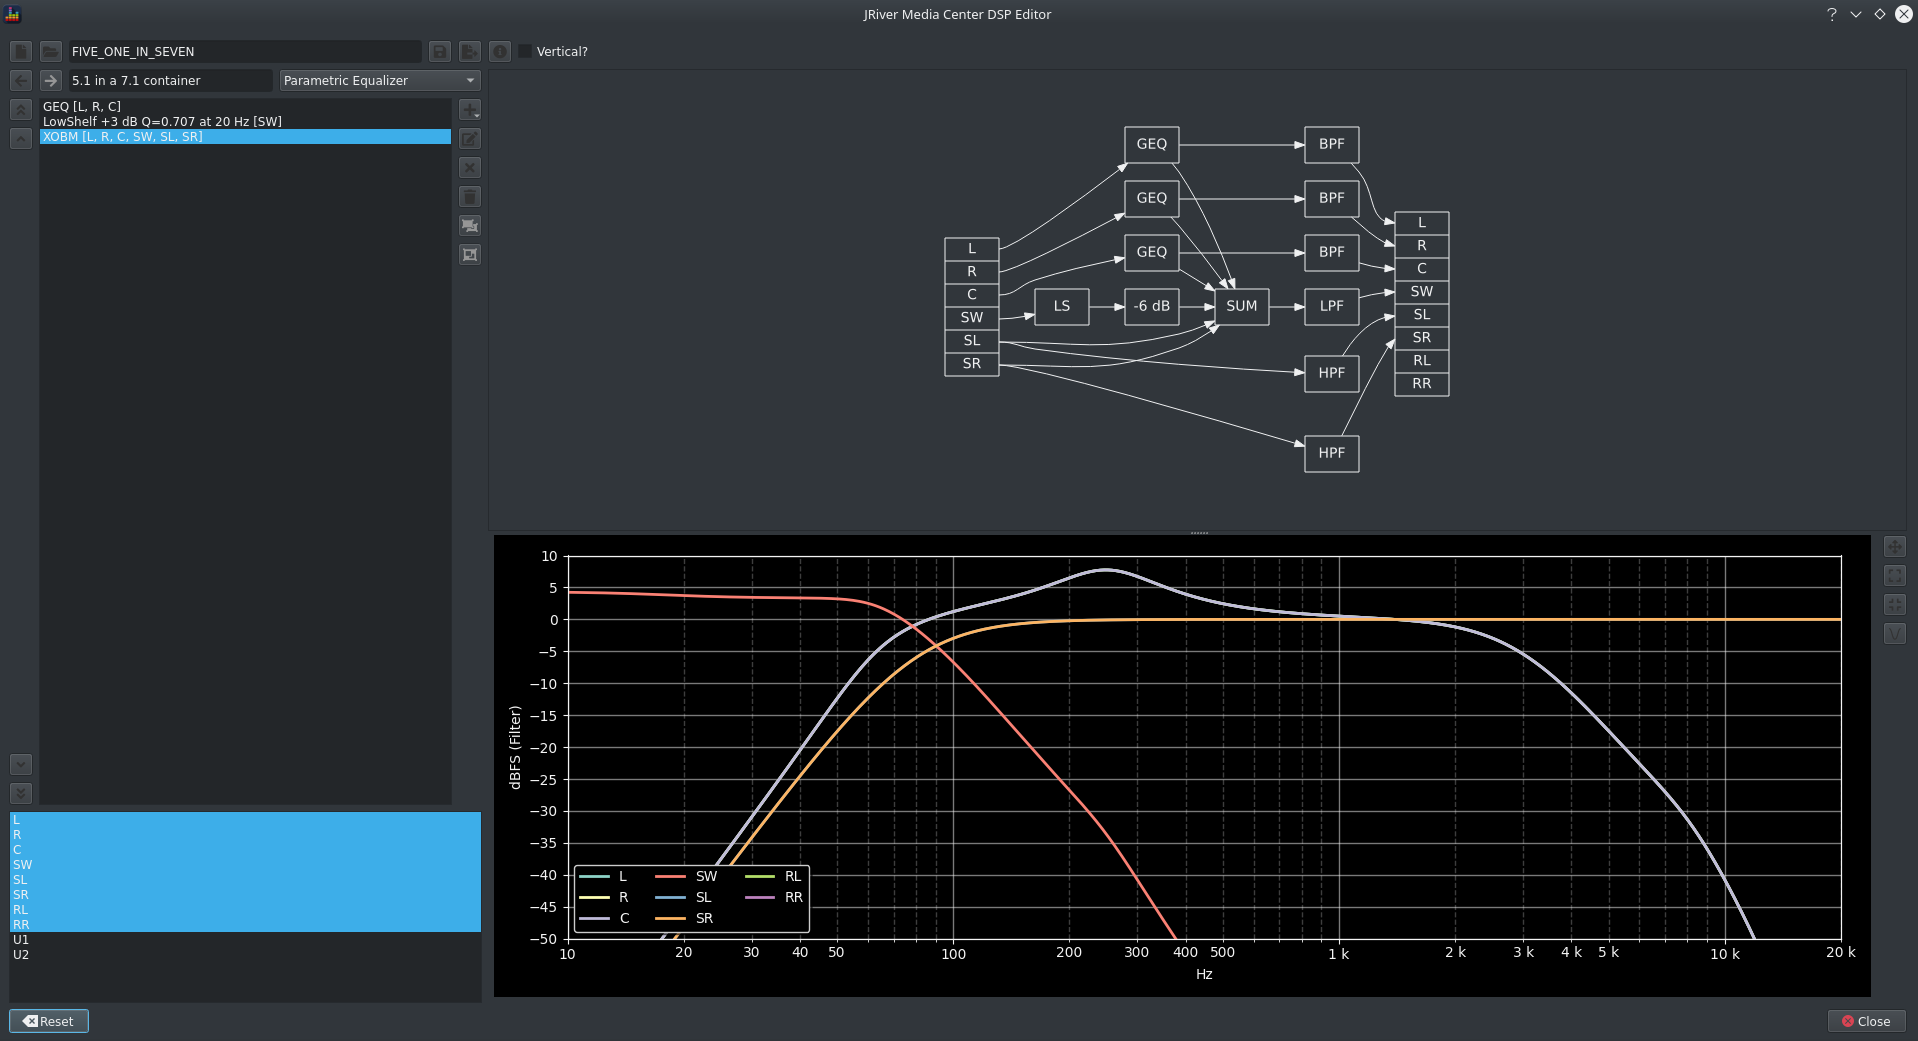
Initial View
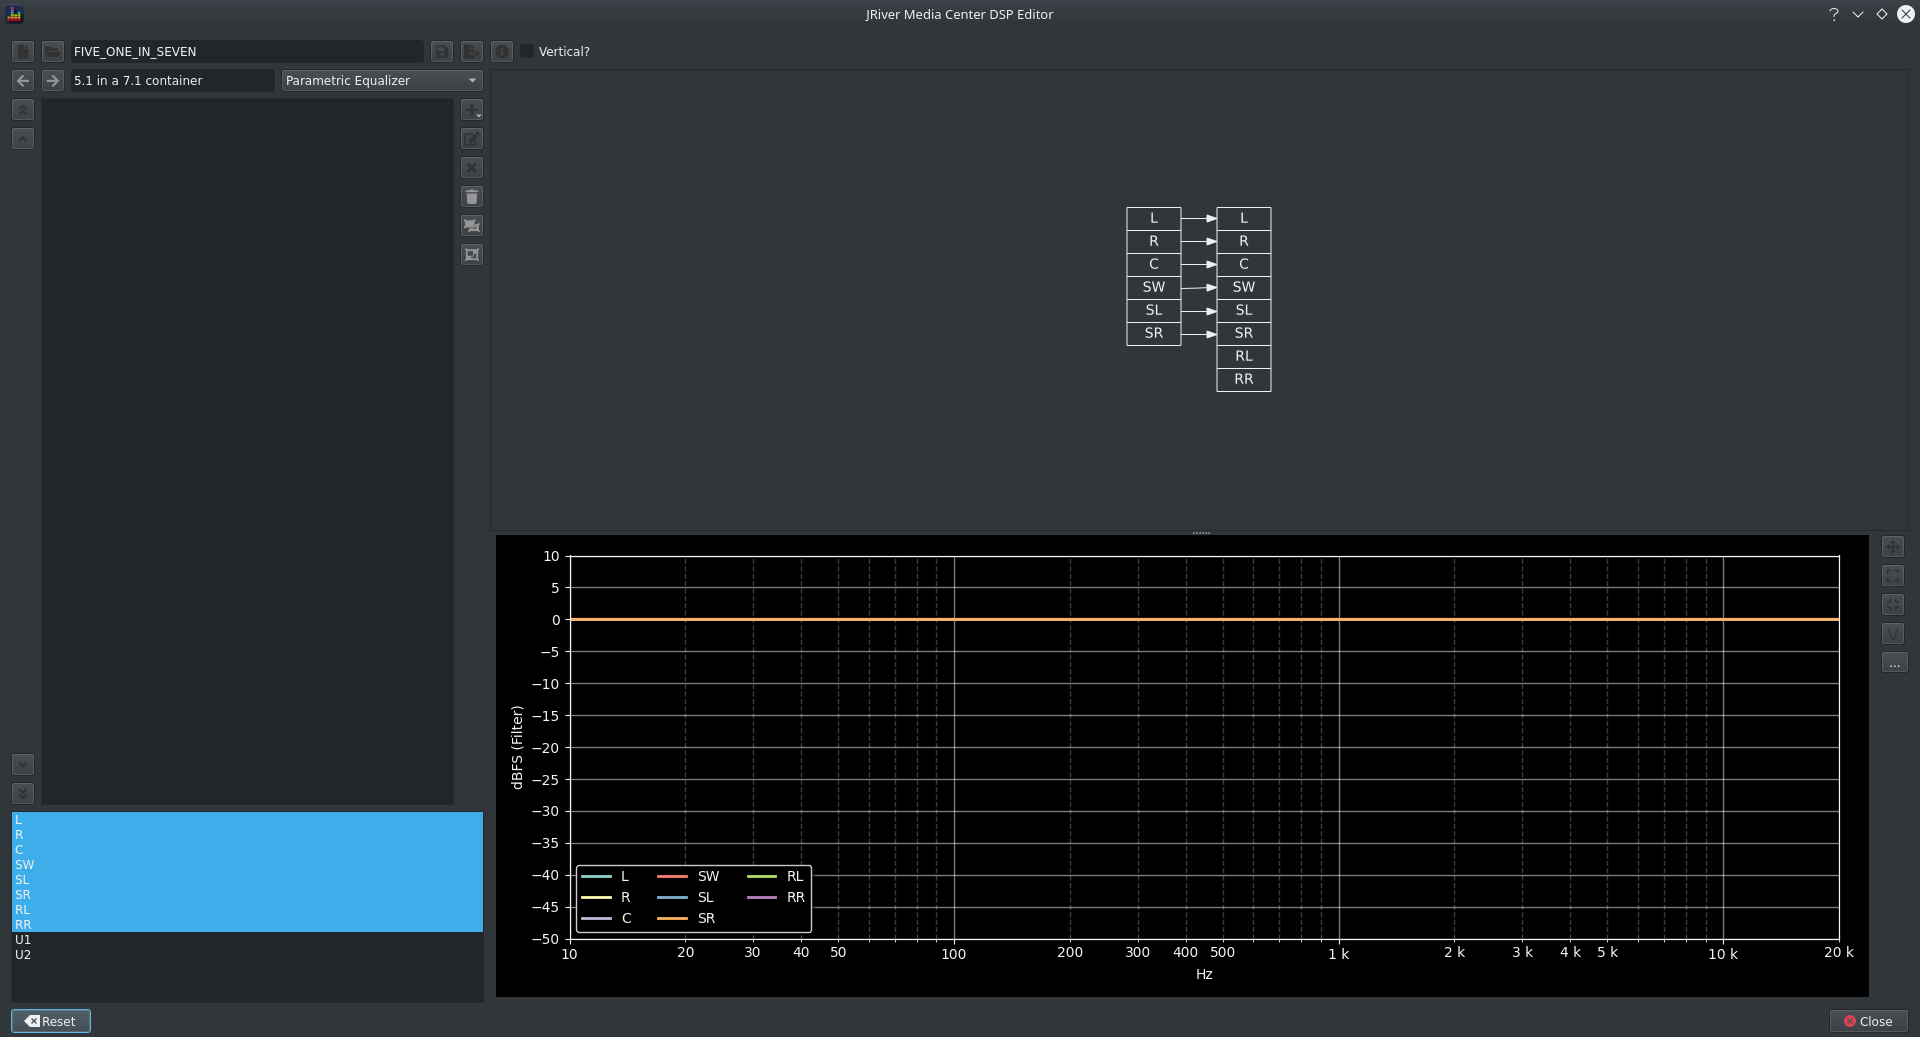
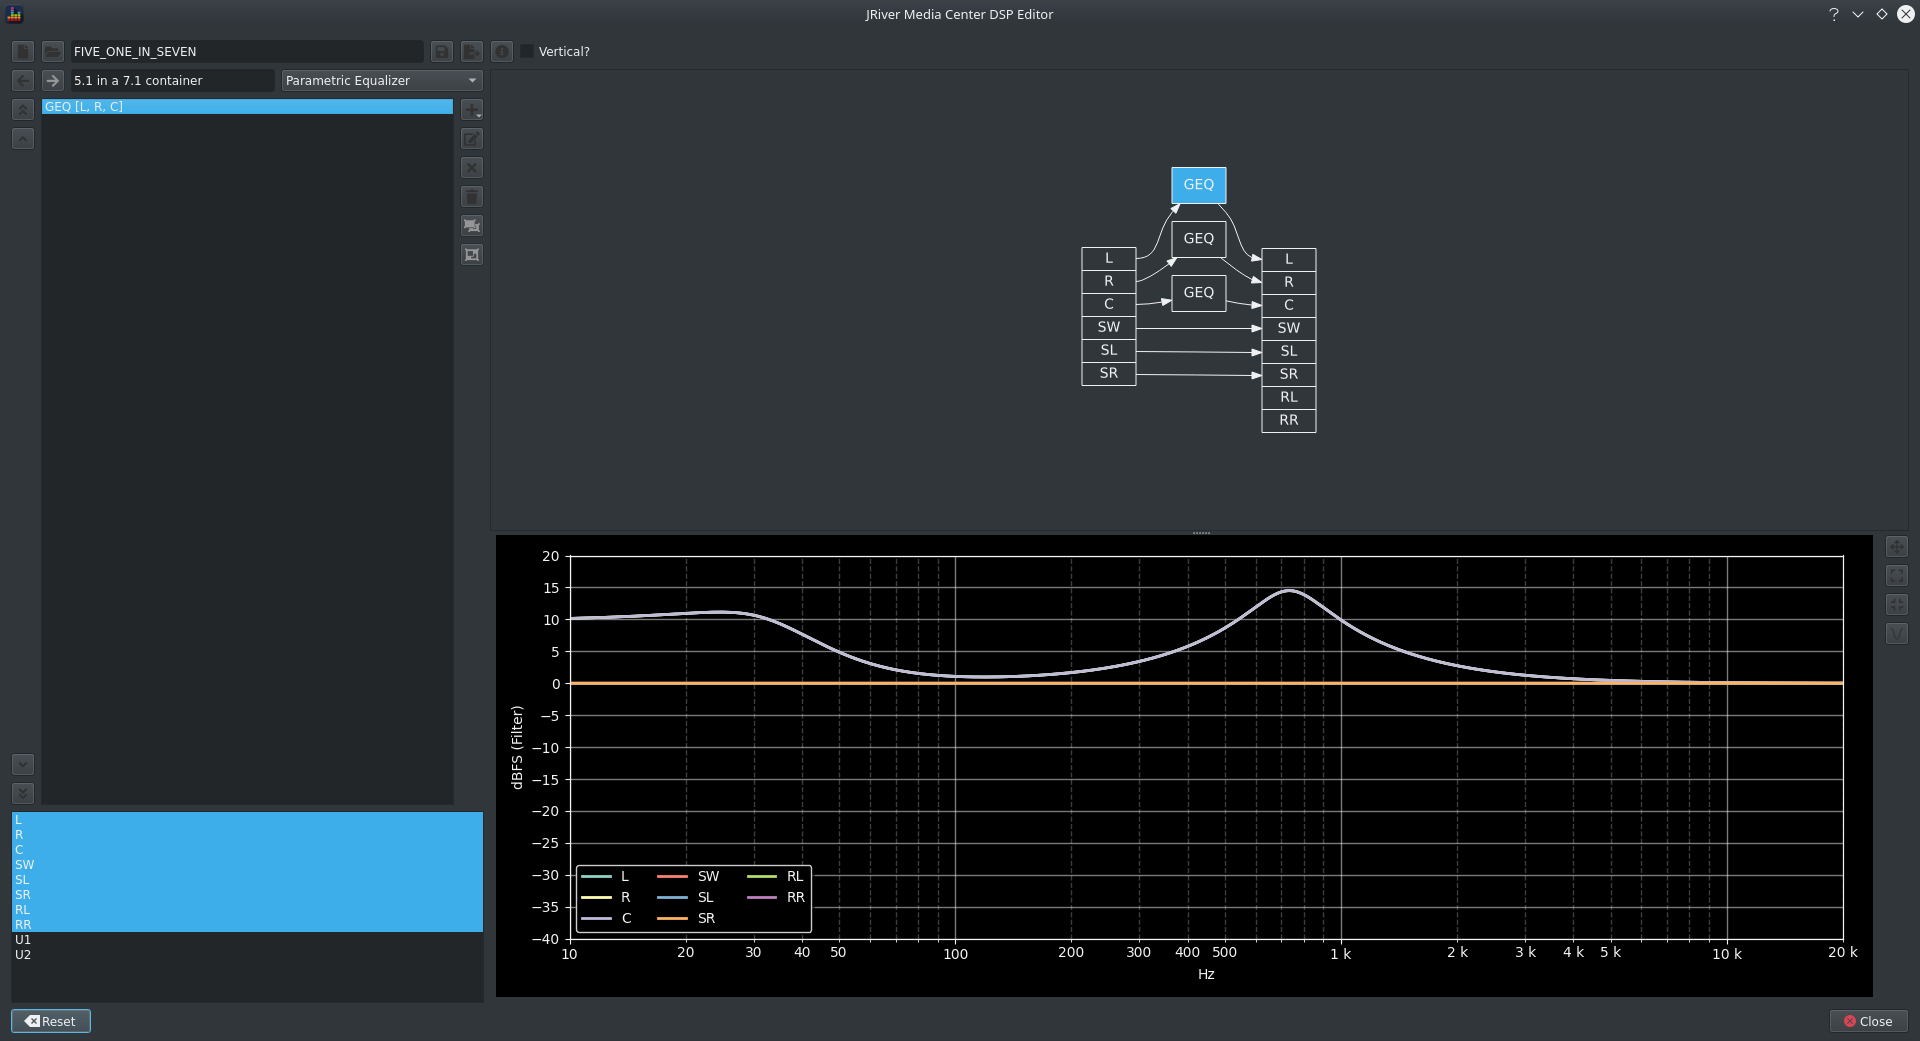
A number of features should be noticeable
- a visualisation of the filter pipeline
- a simulation of the frequency response by channel
Adding Filters
Click the add button to see the supported filter types
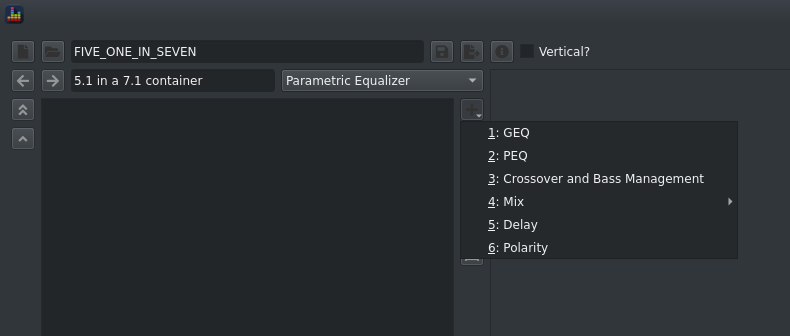
GEQ
After selecting the channel(s) to apply the filter to, the GEQ filter design screen opens
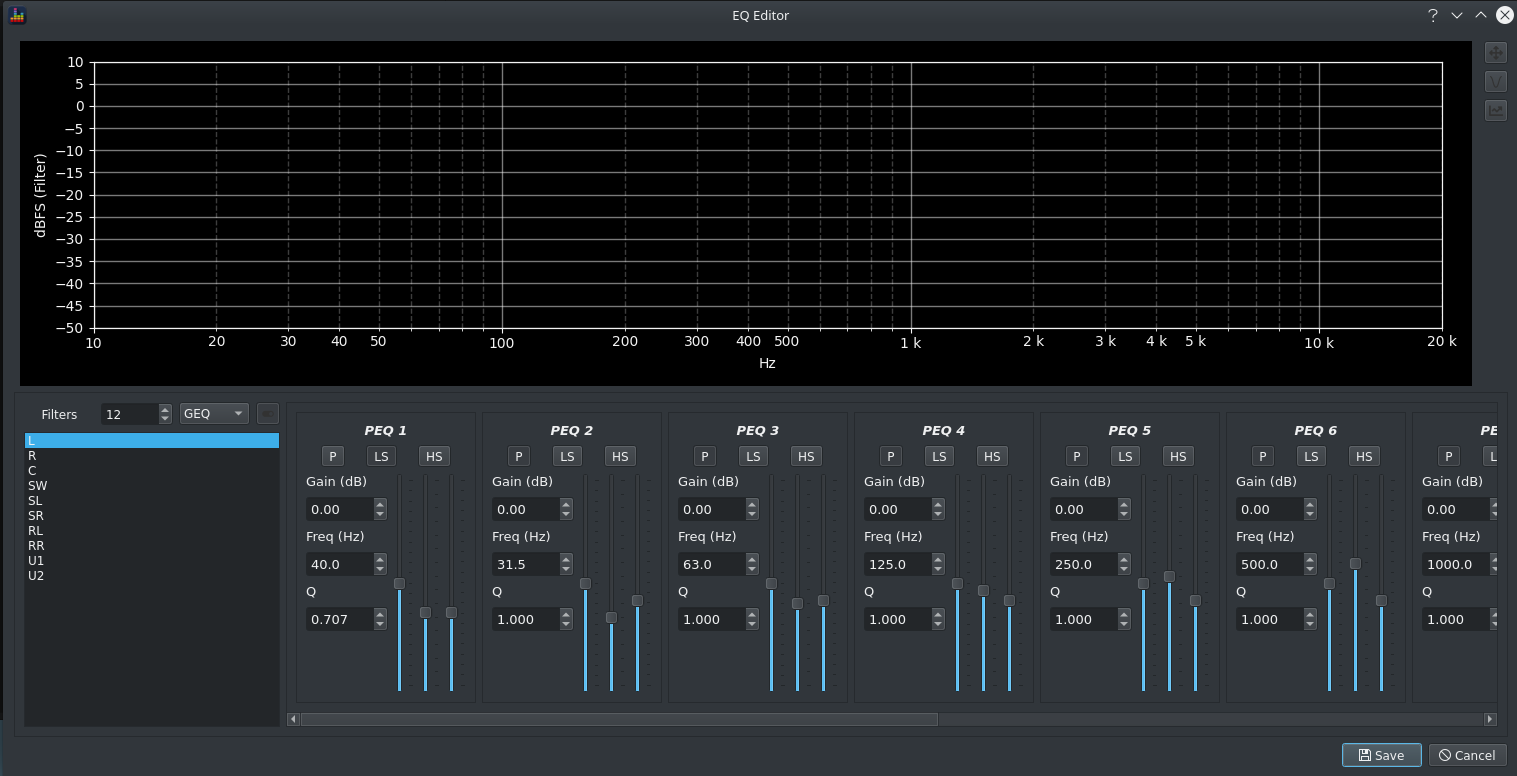
When creating a new filter, this screen replicates the behaviour of the JRiver Equalizer screen with respect to centre frequency and filter bandwidth. It adds additional shelf filters at each end of the spectrum to operate as bass and tone controls.
Each filter is configured usin the available controls
- editable fields for precise value entry
- sliders for interactive use (in order from left to right: gain, frequency, Q)
The preview will update in realtime when any field changes.
Click Save to commit the filter to the configuration. The filter pipeline and simulation will now update to incorporate the new filter.
PEQ
The PEQ option provides access to the BEQDesigner filter designer. This supports:
- creation of a chain of filters for a single channel
- import filters exported from REW
- filter types including
- low and high shelf filters
- peaking filters
- custom high/low pass filters including butterworth, linkwitz riley and 2 bessel filter variants (up to 24th order) and variable Q 2nd order filters
- linkwitz transform
- gain adjustment
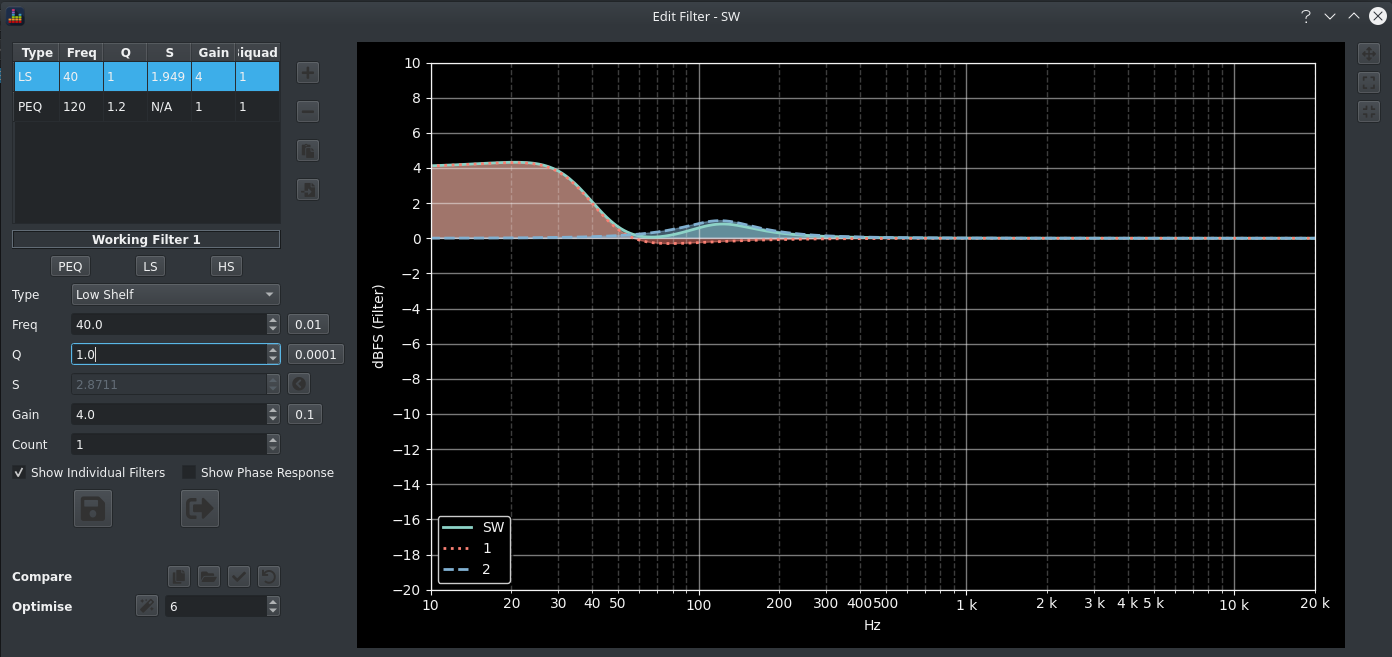
Individual PEQ filters are displayed in the filter pipeline visualisation.
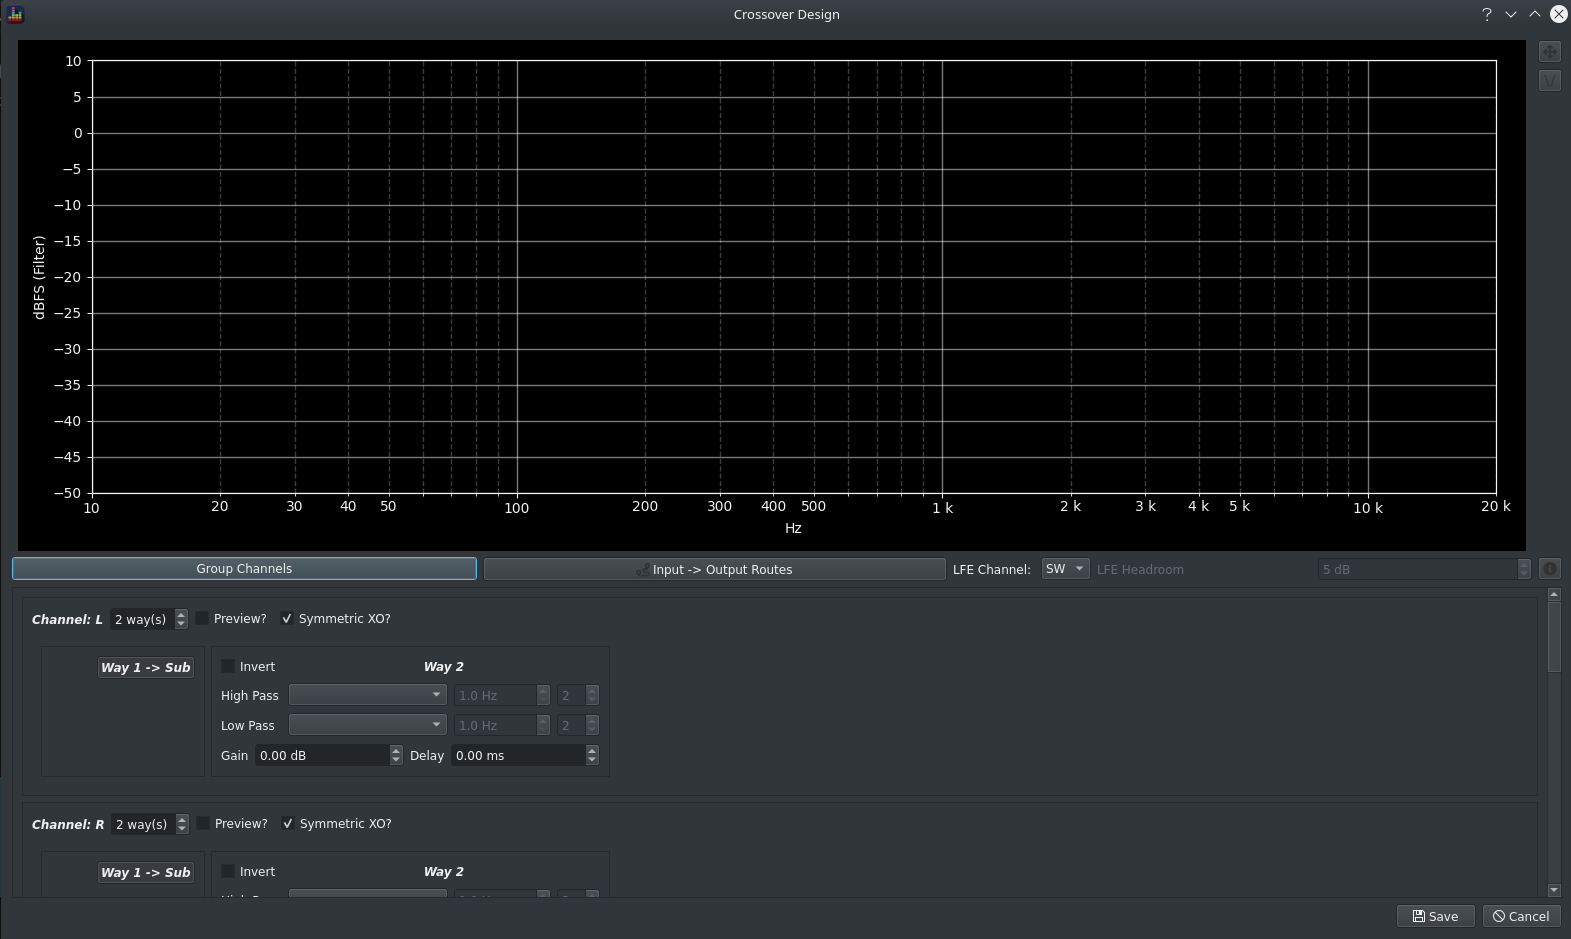
Crossover and Bass Management
This option replaces & augments the JRiver Room Correction screen by supporting
- custom bass management routing including multiple subwoofer outputs and stereo subwoofers
- multiway speaker crossover design
- all BEQDesigner filter types
- per channel per way delay and gain
These features are described below.
Group Channels
Click the Group Channels button in order to apply the same configuration to multiple channels. The intent is to make it easy to manage multiple identical physical speakers, for example identical left-right-centre in a surround setup.
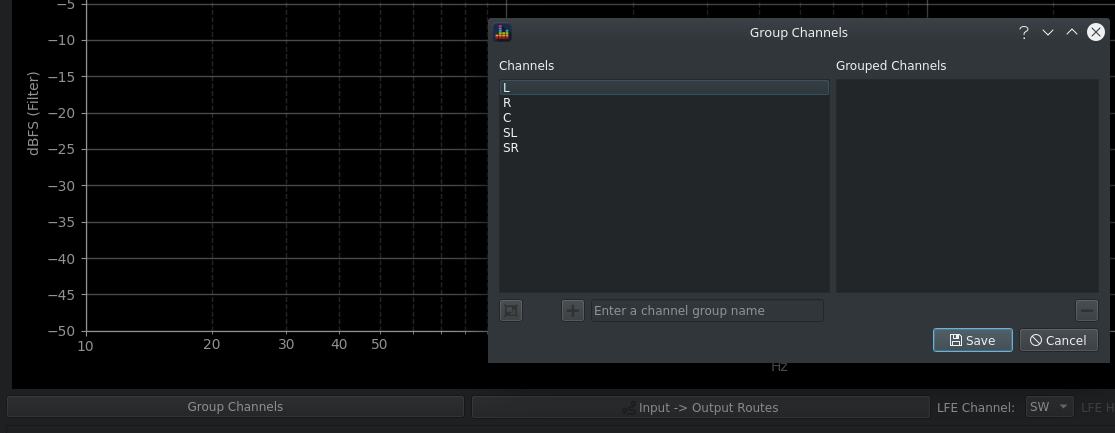
To group all channels into a single configuration, click the group all button in the bottom left.
To group individual channels:
- select the channels to group in the list on the left
- enter a group name
- click the + button
The selected channels will be removed from the 1st left and the new group added to the right.
To remove a group:
- select the group in the right hand list
- click the - button
The channels will be returned to the left list.
Channel Routing
Click the Input -> Output Routes button to access the Channel Matrix screen.
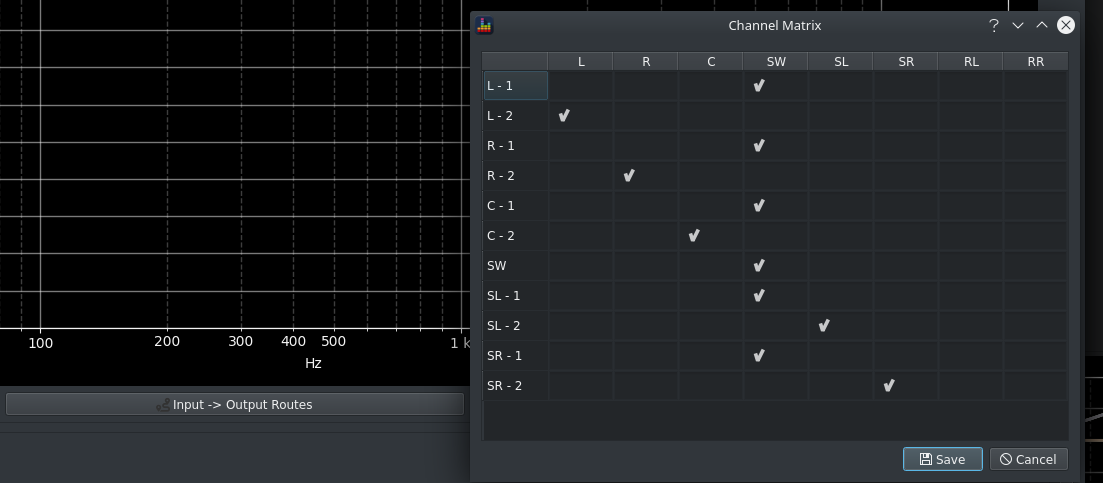
A reasonable default routing is applied depending on whether an LFE channel is present.
- if present, standard bass management routing
- if not, a direct routing of input channel by way to output
Warning
Creating a sensible/usable routing is left as an exercise for the user.
LFE Management
If an LFE channel is specified by the output format, two further options are available:
- LFE Channel dropdown: specifies which (input) channel contains the LFE channel
- LFE Headroom: the amount of attentuation required to accommodate summation of multiple channels. By default, the Dolby standard of 5dB is allowed however this is insufficient for some content hence it is left user configurable.

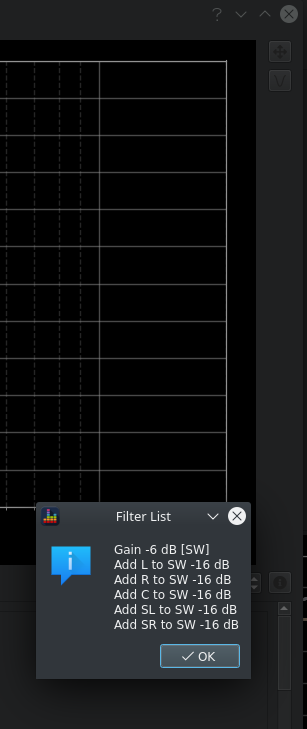
Previewing Filters
The i(nfo) button shows the JRiver filters which will be applied for the current configuration. This is provided for information and debugging purposes only.
Filter Design
Each channel, or channel group, allows for control of the number of ways in the channel and per way:
- the high and low pass filter types, if any
- polarity
- delay (in ms)
- gain
Check the preview box to see a simulation of the response. Check the Symmetric XO box to automatically apply the matching filter to the high pass of the next way. If a SW channel is present, check the Way 1 box to route the way to the SW.
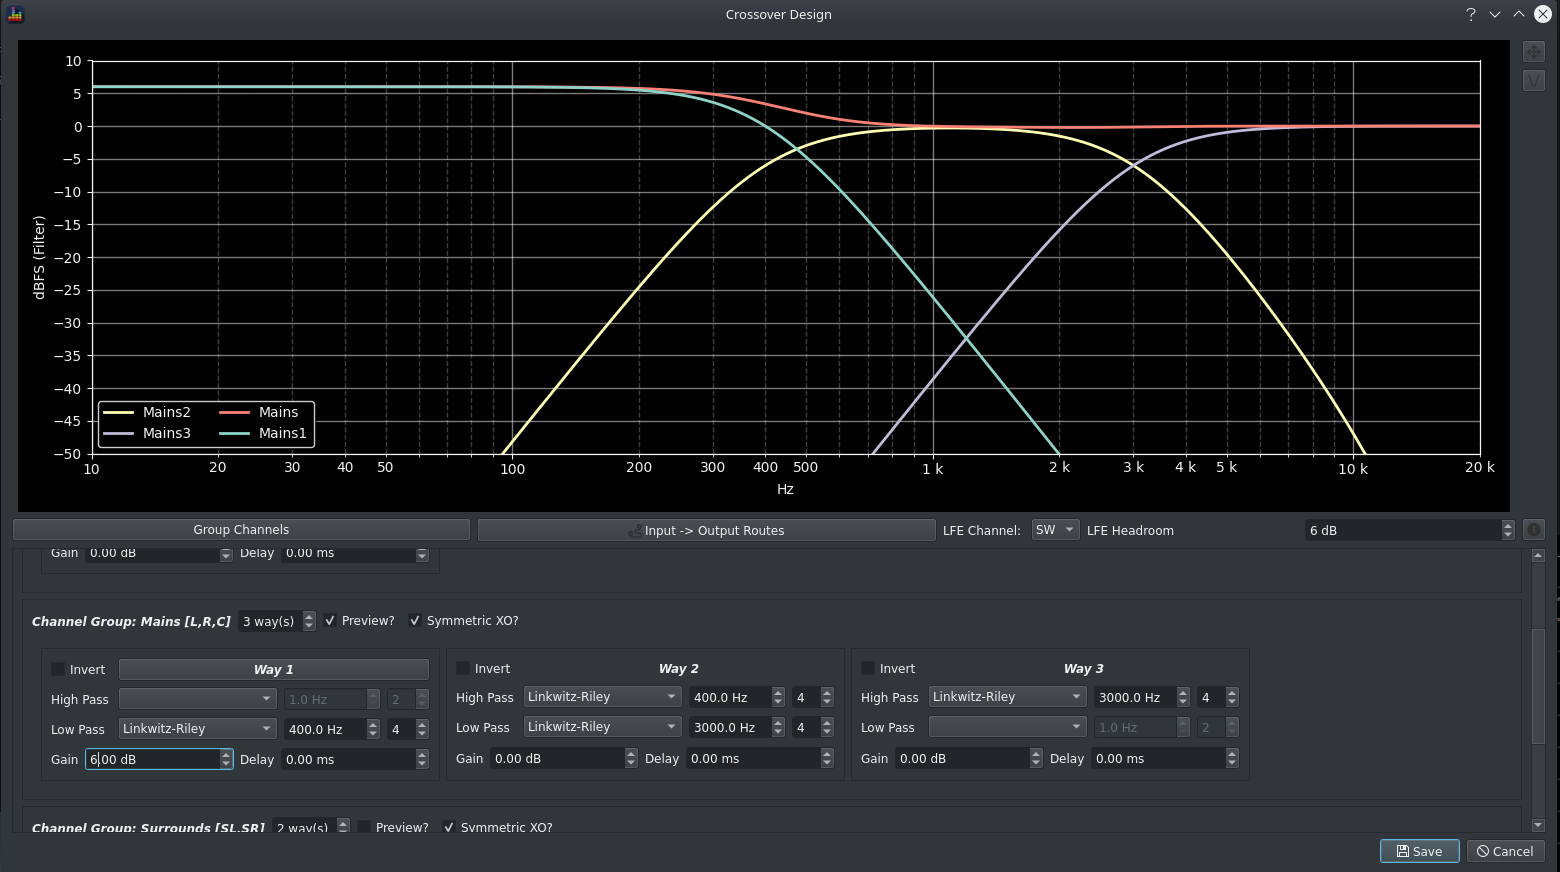
Click Save to apply the crossover(s) and see the impact on the overall filter chain.
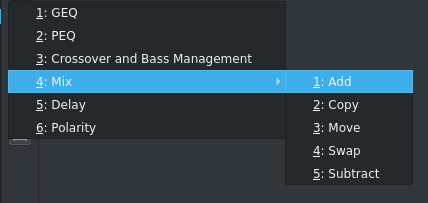
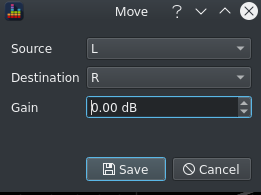
Custom Mixing
The Mix filter behaves as per the JRiver Mix Filter
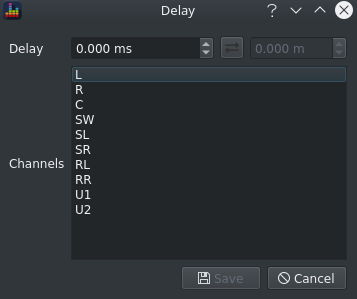
Delay
The Delay filter behaves as per the JRiver Delay Filter and allows delay to be specified in time (ms) or distance (m).
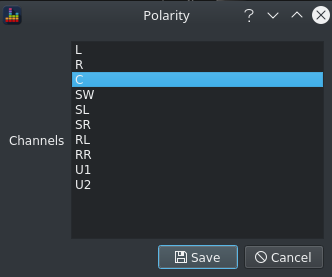
Polarity
The Polarity filter behaves as per the JRiver Polarity Filter The _Delay_filter behaves as per the JRiver Polarity Filter
Transferring Configuration to Media Center
via a dsp file
The configuration can be saved to a DSP file which can be loaded via the Load/Save DSP option in Media Center. To export as a file, click either Save or Save As and select a file to write to.
loading directly into Media Center
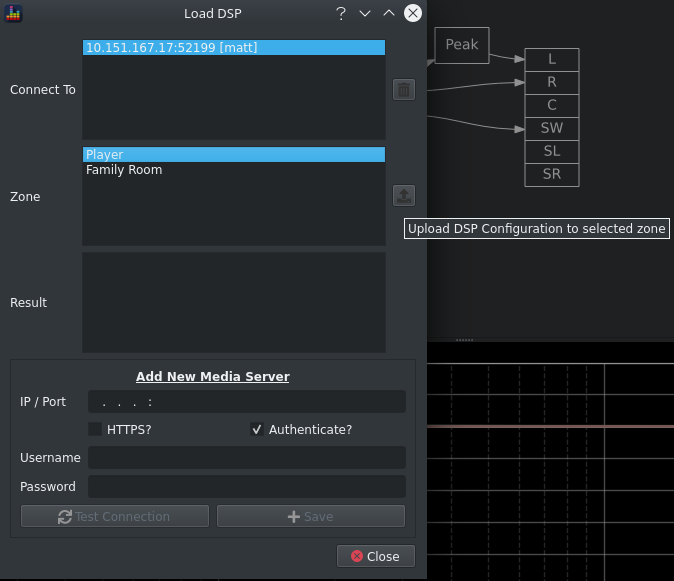
The configuration can be loaded into a zone in a running Media Server if
- Media Center v28 is installed
- Media Network is activated
To do so, click the upload button and select a server & zone then click the upload button. The button should turn green if the configuration is uploaded successfully.
Interactivity
Mouse
- Clicking on a node in the filter pipeline view will highlight that filter and will highlight the corresponding filter in the filter list.
- Right click on a node in the filter pipeline view to access an edit menu linked to that filter
- Double click on a node to edit that filter directly
- The channel list in the bottom left controls which channels are visible in the frequency response preview
Keyboard Shortcuts
Platform standard shortcuts are used where possible, see the Qt docs for details on which keys to use on a particular operating system.
- New: create a new DSP configuration
- Open: open an existing DSP configuration file
- Undo: revert the last filter change
- Redo: reapply the last undo'ed filter change
- Delete: delete the selected filter
- Save: save the current filter configuration to the existing file
- Save As: save the current filter configuration to another file
Commonly used operations are accessible via custom shortcuts
- plus: add a filter
- minus: remove the selected filter
- e: edit the selected filter
- x: delete all filters
- shift+up: move the selected filter(s) to the top
- ctrl+up: move the selected filter(s) up one slot
- ctrl+down: move the selected filter(s) down one slot
- shift+down: move the selected filter(s) to the bottom
Viewing the Results in DSP Studio
All filters created by the filter designer are implemented using standard jriver filter types however there is a not a 1:1 mapping between BEQDesigner filters and JRiver filters. This results in some metadata which has to be exported alongside the filters in order to allow for round tripping back and forth between BEQDesigner and JRiver.
This metadata is stored as a Divider filter in JRiver.
Warning
Editing either this metadata in JRiver will render it unreadable by BEQDesigner. Simple filter types (e.g. a single mix operation or a simple peaking filter) can be editing in either JRiver or BEQDesigner without such problems.