A Worked Example
This section provides some guidance on the mechanics of using BEQDesigner to design a pre or post BM BEQ. It intends to tell you how to create a filter not why you should do or what sort of filter you should apply.
Aspects like experimenting with filter types, deciding on target curves or subjective sound quality preferences are left as an exercise for the reader!
Prerequisites
- You have BEQDesigner installed
- You have access to the movie you want to BEQ in a format that ffmpeg can read (e.g. mkv, bd folder)
Workflow
Step 1: Extract Audio
Extract the audio track from the source file using Extract Audio
- Mix to Mono : Unchecked if creating a Pre BM BEQ, checked if creating Post BM BEQ
- Decimate : Checked
Step 2: Load Signal(s)
Load the signal(s) from the audio file created in Step 1 using the Signal > Add button Ensure the chart limits are set to show the subwoofer range and smoothing is set to None.
Step 3: (Pre BM only) Group Channels
Inspect the peak and average curves for each channel. If multiple channels are at similar levels and have the same shape then link them as a master-slave group.
Step 4: Create Filters
Work on each individual channel, or group of channels if any are grouped, in turn.
Tip
When creating pre BM filters, remove the other signals from the application so the main chart is easier to read.
Inspect the peak and average curves to see where the rolloff begins and how steep it is. To illustrate, lets look at the mixed to mono response of Ready Player One:
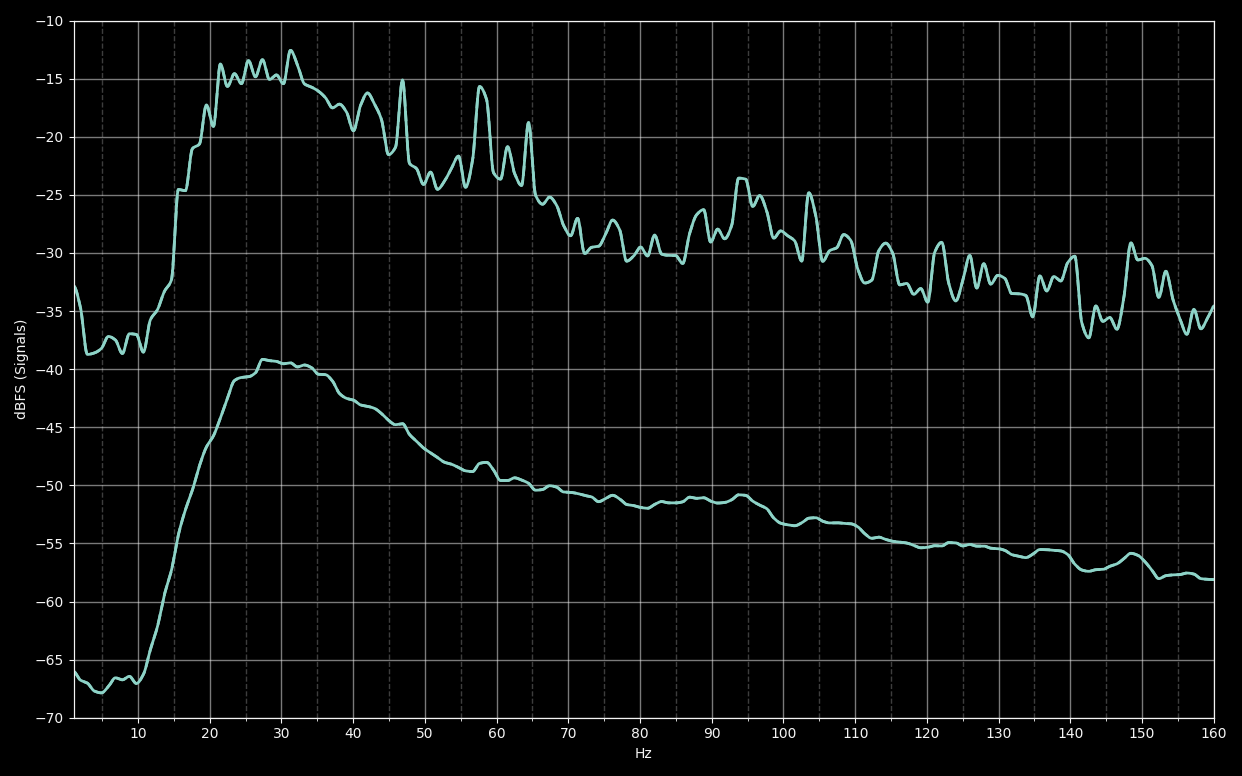
We can see the response peaks at about 30Hz and falls by about 27dB down to 10Hz. Use the Values dialog to get precise values.
Tip
To calculate the slope in octave terms
f1 = 30 Hz
f2 = 10 Hz
d = 27 dB
Our initial goal is to correct this rolloff so we need to apply a filter with a total gain of approx 27dB using an approximately 3rd order slope.
The slope of a shelf filter is governed by the S parameter so we want a shelf filter with an S >2 and <3 (S=1 is 1st order, S=2 is 2nd order and so on).
Danger
Try entering a low shelf with a gain of 27dB and S=3 This is a completely unstable filter with the response utterly dominated by overshoot.
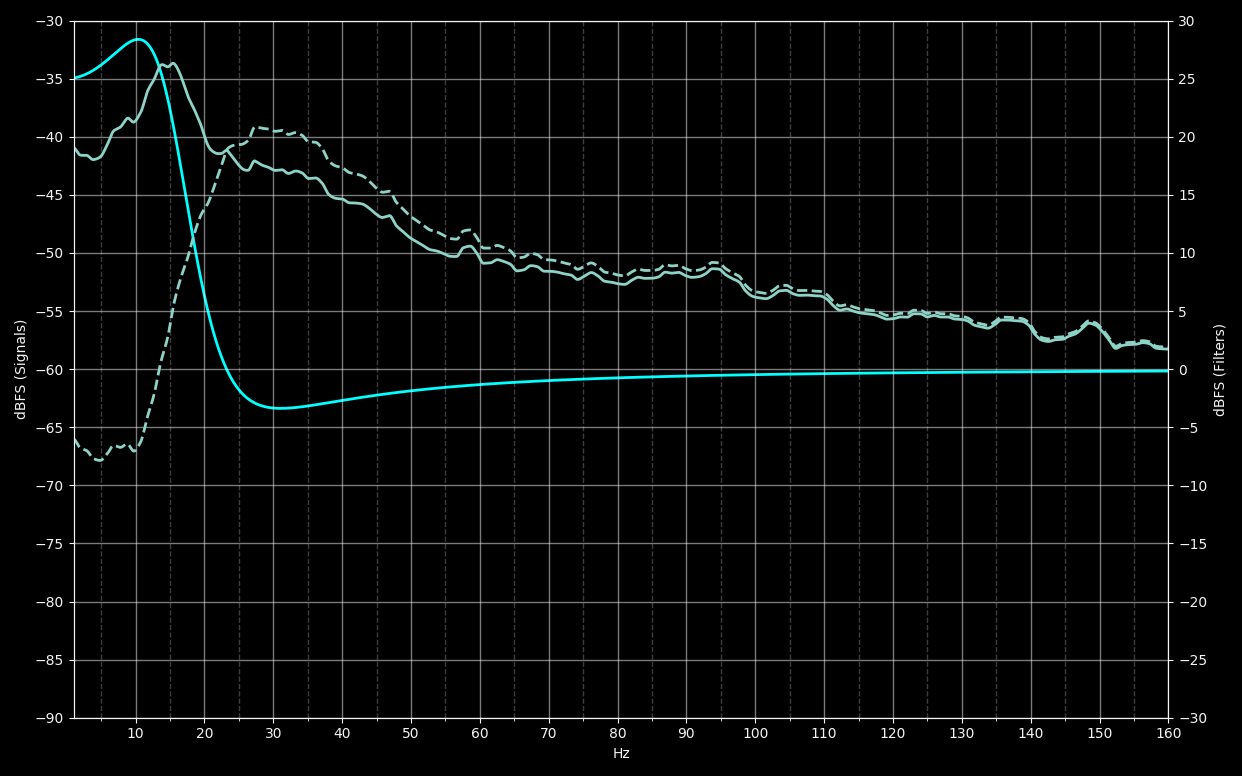
Keeping the limitations of a shelf filter in mind, we'd probably aim slightly low with the S value so lets say try 5 S=2.5 with a gain of 5dB for a total target gain of 25dB and a centre frequency of 18Hz (i.e. somewhere around the middle of the rolloff).

This filter peaks at +28dB which is caused by the shelf filter overshooting.
Save the filter to see the effect on the signal itself, looking at average alone we see
This filter rises too much so we need to edit it, some options include:
- move the frequency up or down
- take steps to reduce Q (i.e. reducing gain and/or S)
- add PEQ to compensate for the overshoot
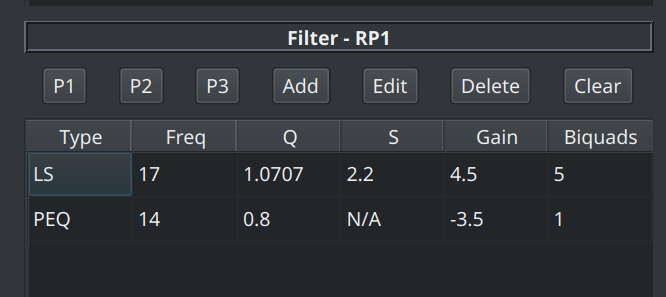
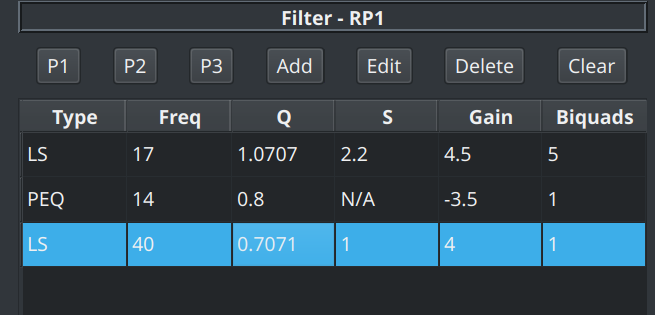
Some trial and error leads to
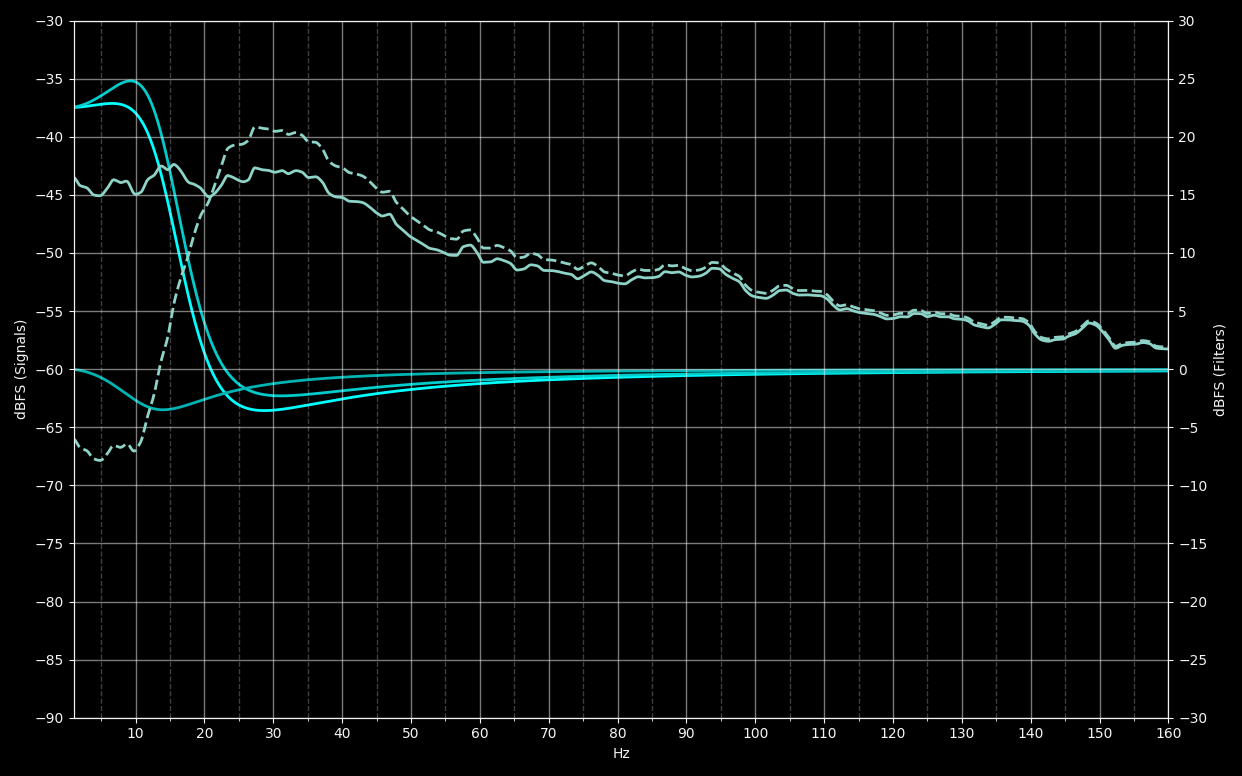
in which we have:
- reduced S to 2.2
- reduced total shelf gain to 22.5dB
- added a PEQ to reduce the overshoot at the top of the shelf
We seem to have fixed the rolloff but the undershoot at the bottom of the shelf has reduced the previous 30Hz peak. It is debatable whether this is a good or a bad thing but fortunately we have the tools to fix this if we want to. For example, by adding another compensating PEQ (to boost the depression) or a low S shelf filter.
Here's an example
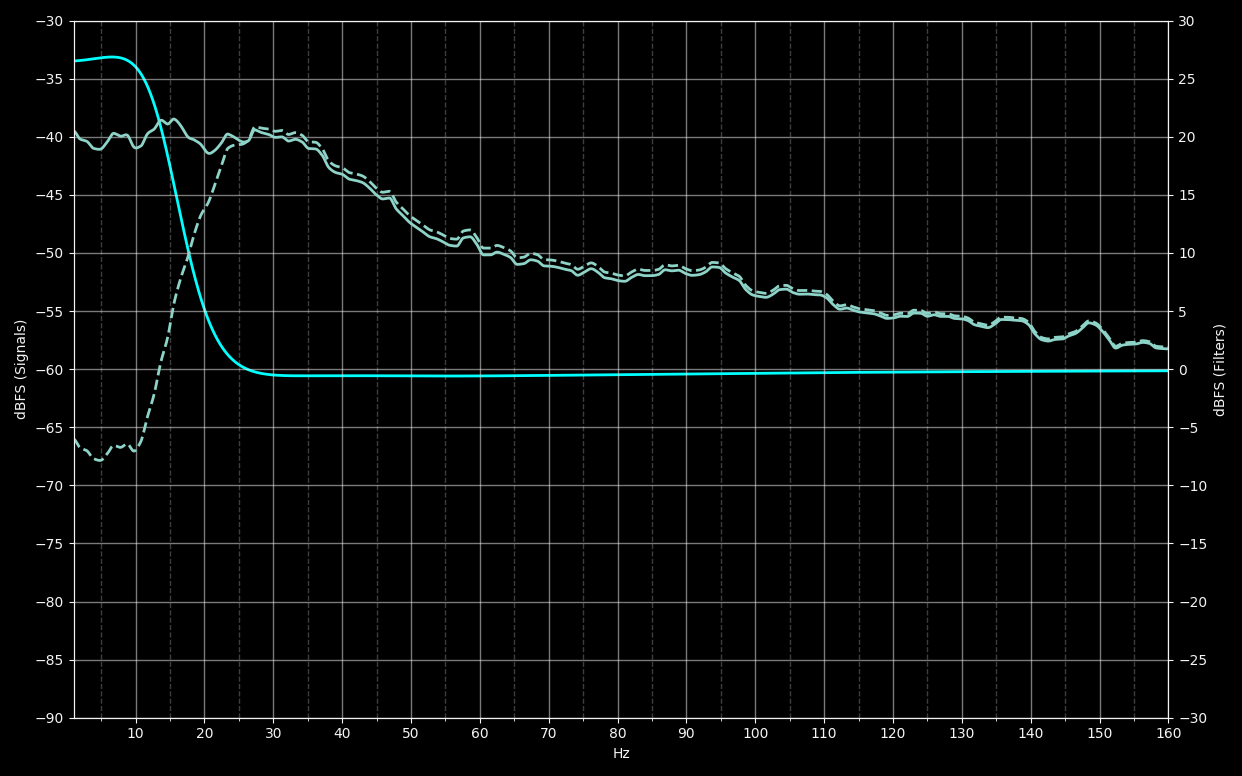
using S=1 +4dB low shelf filter to flatten it out
Now we've restored our 30Hz level while still recovering that rolled off content.
Tip
Use Presets to store a few different filters so you can quickly switch back and forth to see the difference.
Remember that CTRL+ALT+1 (or 2 or 3) saves a filter in a preset slot and CTRL+SHIFT+1 (or 2 or 3) applies the filter from that slot.
Step 5: Optimise the Biquad Count
You may have used more biquads than your hardware can handle. This is particularly likely to be the case for minidsp 2x4 (non HD) users who can only use 6 biquads on the input channels.
If this is the case, take another pass over the filters to see if you can reduce the biquad count.
Step 6: Check for Noise
Open the waveform view, select the channel you're working on from the Signal dropdown and open the spectrum view.
Configure as follows:
- select the same signal for comparison with a single checkbox checked
- set the frequency range to cover the area over which the filter is operating (1-40Hz in this case)
- set Type to Ellipse or Point
- set Filter Type to Constant
Now click Compare
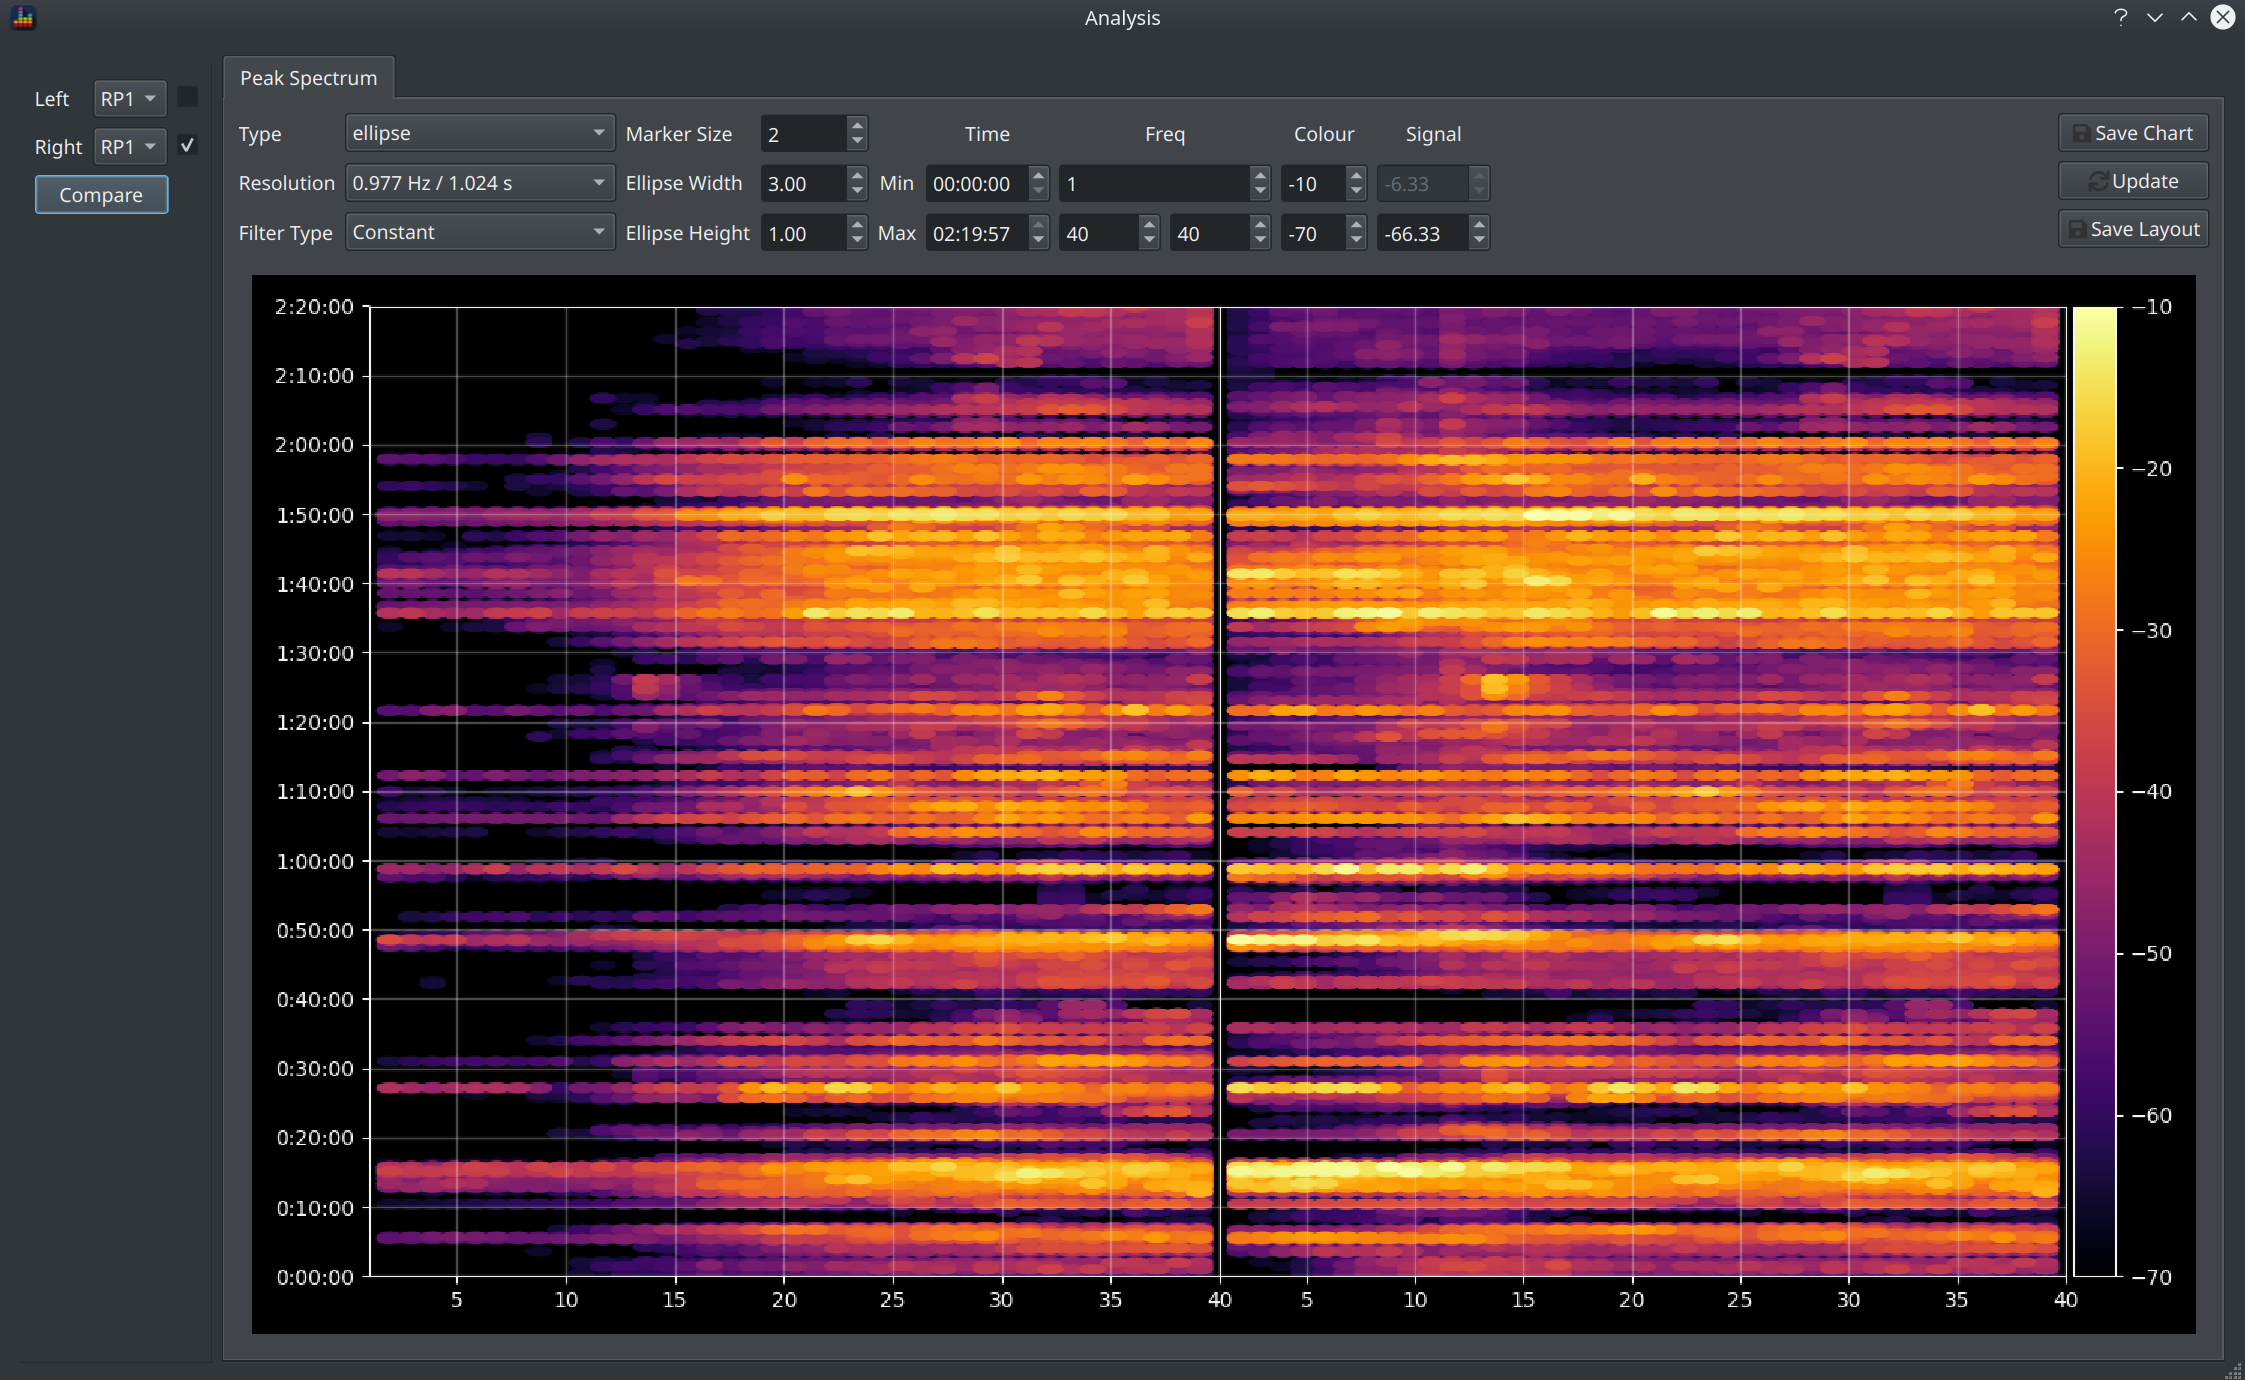
It's clear that real signal is being boosted as we do not see a large expanse of a similar colour in the lower frequency range, instead we see existing big hits being extended <20Hz which is exactly the point of BEQ.
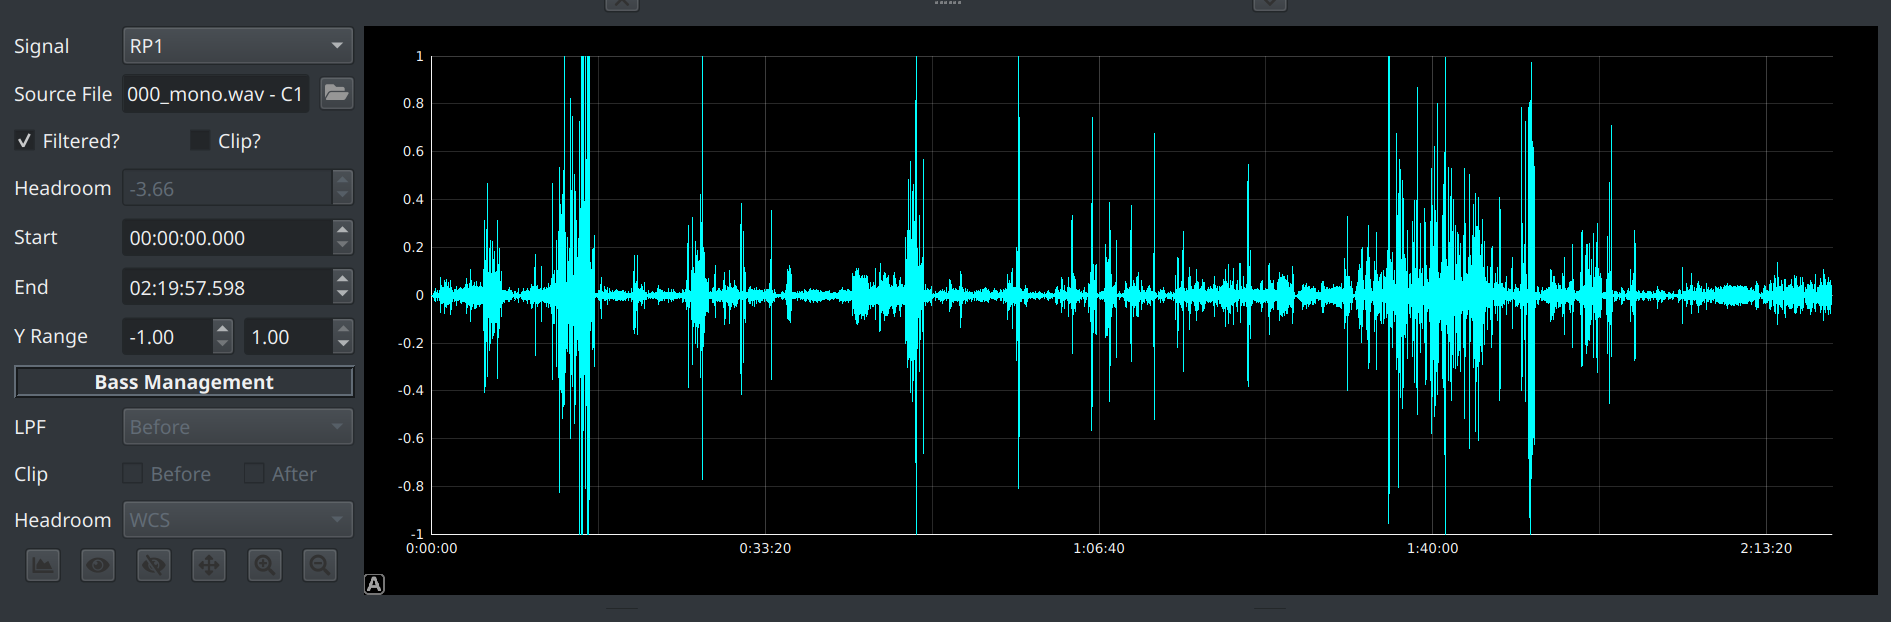
Step 7: Check Headroom
Return to the waveform view and check the Filtered checkbox.
If Headroom is negative then a corresponding gain adjustment will be required to avoid clipping.
Info
For Post BM BEQ, this is as simple as reducing the master volume by this amount.
For Pre BM BEQ or for remuxing Post BM BEQ, you need to check headroom across all channels and then reduce all channels by the absolute max negative headroom value.
In our Ready Player One example, we see we need to reduce by ~4dB
Step 8: Demo!
If you're happy the shape looks ok then it's time to demo your work.
Tip
This is the fun part and also the most important part. As with everything in audio analysis, the goal is something that sounds really good not just a nice graph.
It's generally impractical to watch an entire film on every iteration of a filter so you need to take some shortcuts. One approach is to
- pick a couple of scenes to cover some heavy hitters and some scenes with some more normal content
- dial in the filters to your DSP device
- listen to both filtered and unfiltered audio tracks
Tip
Watch out for obnoxious and/or unnatural sounds which are likely to be more objectionable then the extra heft a good BEQ brings.
Step 9: Share
If you're happy with the results then create a report and share your work with the community!
Filter Strategies
The main weapon in the BEQ armoury is the Low Shelf filter, unfortunately this type of filter has some limitations which require some care to work around.
The Low Shelf
A Low Shelf filter is defined by 3 key values:
- S : the shelf slope
- Frequency : the centre frequency, i.e. the point at which half of the gain has been delivered
- Gain : the ultimate change in gain caused by the slope
This example is S=1 +5dB at 30Hz

We can see that the shelf has a smooth shape and reaches a gain of +2.5dB at 30Hz.
Shelf Limitations
Take a look at the same gain and frequency but with gradually increasing S values
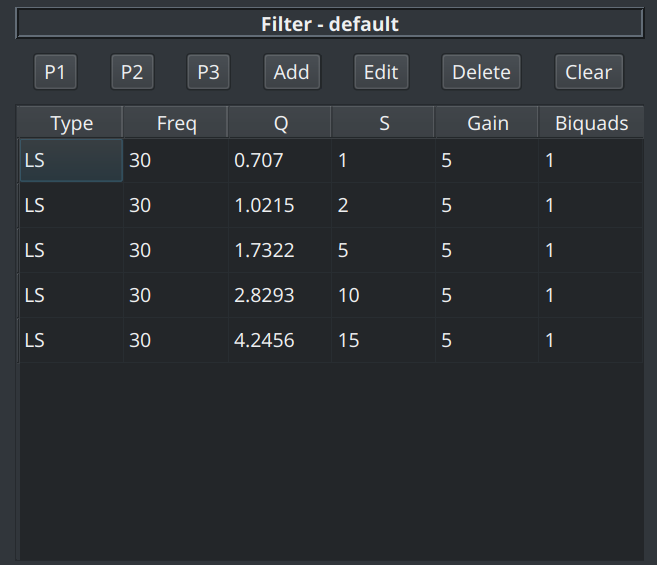
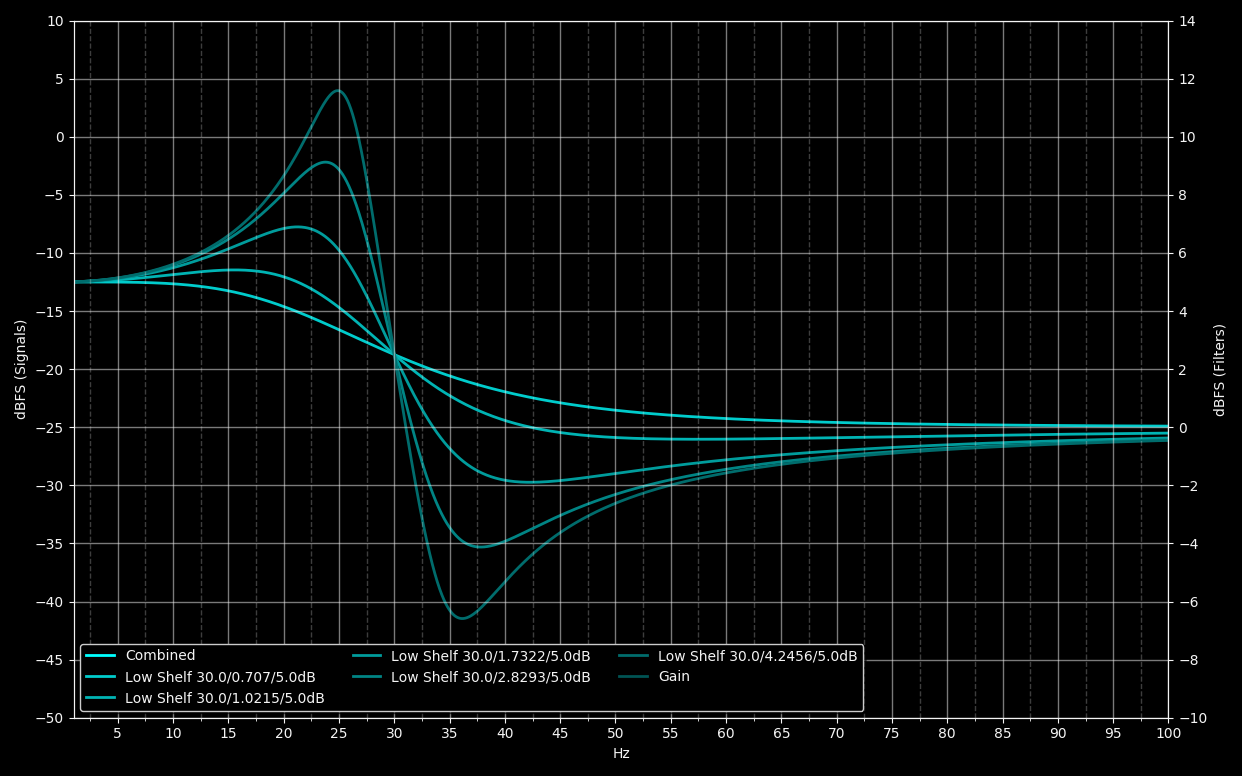
It's clear that shelf filters with S > 2 become increasingly unuseable due to the excessive overshoot at either end of the shelf
The overshoot with S = 5 is extremely large at this gain and we can see Q = 1.7 in this case with S = 5.
Tip
A rough rule of thumb is that S <= 3 and/or Q <= 1.3 is a filter which can be used without significant corrective action.
Counteracting Overshoot
As illustrated in Step 4 , PEQ and/or additional shelf filters can be used to counteract the overshoot at either end of the shelf. There are no fixed rules dictating how to do this, it's simply a case of using your eye to dial it in.
S vs Q
The slope of a shelf filter is specified by S hence why it is useful to talk in terms of S when dealing with shelf filters. However most DSP platforms ask the user to enter a shelf filter in terms of Q so BEQDesigner allows you to define a shelf filter by either Q or S and will report the other value for reference.
S is related to Q and Gain so changing either Q or Gain will change S (and vice versa).
Pre or Post BM BEQ?
If you have the signal chain that can implement either style of BEQ then the question arises of which style should be preferred.
Ultimately there is no right or wrong answer to this question but there are some objective points we can list:
- if the intent of BEQ is to recover filtered out content then pre BM BEQ is the technically correct solution as some tracks show significantly different rolloffs per channel
- some tracks rolloff all channels with the same shape
- some (many?) tracks only have significant LF content on the C channel and/or put the surrounds a few dB down
- the SW output is invariably dominated by the LFE channel due to the +10dB level change
As such, we can conclude
- there are undoubtedly tracks that will benefit from pre BM BEQ
- there are other tracks that will behave the same either way
- there is no way to know, in advance, whether pre BM BEQ is audibly superior to post BM BEQ
Ultimately, as with many things audio, you just have to try it out for yourself and decide.